Posts tagged with “sewing”
Posted on . Filed in . Tagged with , , , , , , , , , , , , , , , , , , , , .

Can New Technology Be Loved?

Part of getting old seems to be seeing the things you love become extinct. Tea cups and saucers, clocks, books, hand sewing and embroidery, hand written letters, postcards, birthday cards, silver sets, so many things disappearing or becoming unwanted by the younger generations as they come along with new technology.

But, I notice the old things I love still last longer than the new things coming along. Maybe not in purpose but in strength and durability. New technology is made to break and be replaced. Can it be loved like the old things when it isn't made to last? I don't think there is enough time before a new one is needed and the old hits the landfill.

Posted on . Filed in . Tagged with , , , , , , .

Whoopee Jughead Hat History

I don't wear a lot of hats, literally. But, hats are always interesting. Partly because people don't wear them often any more. People who do wear hats, unless they're hiding baldness, do seem more interesting, just because they chose to wear a hat. I was a kid when the Archie comics were around, long before the Riverdale TV series. But, the Jughead hat began before Archie and his comics. It is often called a whoopee hat.

The style is called a whoopee cap and, believe it or not, it was insanely popular among young people when Jughead made his comic book debut in 1941. Turns out, factory workers used to invert their felt fedoras and chop off the brims so their eye sight wouldn't be restricted while working. When they got new hats, they'd pass their old hat down to their kids and the crude fedora hack actually became trendy among their kids.

Quoted from Seventeen Magazine online.

Most of the whoopee hats I find online are crochet or knit now. An authentic hat would be made from felt, a thicker felt than I could find in craft shops. To make a whoopee hat now you would need to search for a better kind of felt, one that might even be washable a few times (at least) before it fell apart. Finding a better grade of felt would be harder than finding a pattern (if you need one) to make the hat. Instead, you might buy (try a thrift store) a felt hat with a brim you can cut, turn it inside out and wear a real whoopee/ Jughead hat you created yourself. Add your own pins or brooches to it. Now that you're a hat maker, think of other styles to work on and wear. Like the cloche hat from the 1920's or some Edwardian hats, romantic and elaborate but all made with felt. Maybe fascinators, all the hat trimmings without the hat (sort of). Maybe a more structured top hat with fancy trimmings leftover from those fascinators. Soon you will become a regular milliner/ hat designer and maker.

Here are some patterns I found, for your Mad Hatter inspiration.

Posted on . Filed in . Tagged with , , , .

Crazy Quilting: Repurpose your Sewing Scraps

Crazy quilting is another way of creating patchwork quilts. Crazy quilts don't use a pattern (traditionally). They are the ultimate in scrap quilting. Crazy quilts are often heavily embellished too. Some use ribbon embroidery.

Crazy Quilting is More than Just Embellished Patchwork

The first crazy quilt I saw was embroidered with delicate stitches, beads and other little things. There were images of birds, spiders and other creatures and things the quilter must have liked or been thinking about. She (I'm assuming it was a woman quilter) had used fabric scraps, fabric and textiles from used clothes, her own wedding gown and her Mother's wedding gown, cigar bands and assorted other textiles which I no longer remember. That quilt was full of local history and her own personal history. All together it was an elaborate masterpiece to keep you warm, snuggled up in your bed each night.

Early crazy quilts were from the 1800's, were made with silk and velvet then heavily embroidered. Often beads, buttons and accessories were added for an extra glamorous touch. Though the idea was to recycle, they were meant to be showy creations. It's a shame to see some modern crazy quilts which have become far more on the practical side versus being gorgeous and decadent looking. But, the concept is still the same.

Vintage Vogue - Crazy Quilt Blocks - https://thatgrrl.com/blog/includes/download.php?file=vintage-vogue-crazy-quilt-blocks.pdf

Posted on . Filed in . Tagged with , .

Be Creative with Ribbon Embroidery

Ribbon embroidery looks complicated when you see some of the wonderfully feminine and romantic looking work done by others. But, if you learn some basic embroidery stitches like the straight stitch, stem stitch and the French knot you can already begin to embroider with ribbons. The trick between regular embroidery and ribbon embroidery is to leave a bit of extra slack in your thread so they are not pulled too tight. You want the ribbon to look placed rather than pulled.

My favourite ribbon embroider work are whole gardens of flowers, especially those I have seen on old, Victorian crazy quilts.

Ribbon Embroidery Resources

Embroidery with Ribbons

I fell in love with ribbon embroidery at least 20 years ago when crazy quilting became popular for awhile. Ribbon embroidery was an extra, an embellishment used on some of the old Victorian crazy quilts.

Ribbon embroidery is mostly about flowers. Now all of it though. It's usually very feminine looking but I've seen some ribbon embroidery used in creative, unusual ways too.

I like hand sewing. Most of the sewing I do is either making Christmas ornaments or mending. I hand sew buttons, hem and mend holes. I don't know how I end up sewing everything by hand. I do have a sewing machine, a very good one which my Mother bought me as a wedding present. It's tucked away in a cabinet. Maybe the idea of taking the time to thread it and set it up keeps me from using it. Meanwhile, you can thread a needle and start sewing by hand right away.

Ribbon embroidery is so romantic and feminine looking. I can't see a machine ever being used for embroidery with ribbons. For one thing, just try running the ribbons through the machine instead of the much thinner thread they are meant to use.

Posted on . Filed in . Tagged with , .

Repurpose Vintage Denim: Make a Purse

A denim purse has great looks, great style and does great when it comes to wear and tear. Wouldn't you like a denim purse, backpack, book bag, or some other denim purse sort of thing for yourself?

Almost every purse or backpack I have bought myself has been denim. My Mother made me a denim purse when I was a high school kid too. I remember how often people commented about that purse, in good ways.

I do my own sewing but I've stuck with embroidery and sewing by hand. Most of the sewing I do is mending, hemming and Christmas crafts/ ornaments. I do have a sewing machine but I've hardly done more than unpack it and pack it up again each time I move to a new address. I always intend to use it, get comfortable with how it works. There are so many craft projects I could be taking on if I was using the machine and sewing patterns. Now sewing patterns are so much easier to get, for free even, online. There really is not good reason not to get that sewing machine out and make great things with it.

I want to make my own purse, backpack or bookbag from recycled (upcycled) denim and trimmings. I'm going to start by looking at patterns and ideas. I like a purse with lots of pockets and niches to stash things and keep from having everything tossed into one central big pouch. I also want good straps, since they seem to wear out sooner than anything else on the purses I use. So those are the things I will be looking for in patterns.

General Plan for Sewing a Denim Purse

Start by giving the old jeans you want to use a wash in the machine. Dry them well and if they are wrinkled give them a touch of the iron to smooth them out.

Look at patterns for purses or backpacks or laundry bags, etc. You can do this without a pattern but the pattern is a good thing when it comes to the logistics and having a plan of how to pull it all together. Especially if you want extras like pockets, lining, inside pockets and dividers.

Don't begin cutting the jeans until you have a plan for the purse, backpack or bag you want to make. Draw a pattern for the main bag and extras like a handle. Fit them by pinning the pieces together and see how they hang - is a purse strap going to be too long or too short? Will you be able to fit your books into the book bag? Do you need a lining - which will mean cutting extra denim or recycling something else to have a different fabric for the lining.

Once you have your plan cut out the pieces, give extra space around the edge for the seam once they are sewn together. Cut the denim for the handle and any side pockets and such.

Sew on pockets and extras as you want them, not the purse strap however. Once you have the body of the purse all set and ready to be sewn together (including a lining if you want one) put the main pieces back to back (they should be inside out). Begin sewing around the edges. Leave the top open - but hem it if you have rough edges there.

Sew the purse strap on before you finish sewing the two parts of the body together. You should have left some room to tuck the ends of the strap into your seams. Or, sew extra seam and double sew over the straps for extra strength. Look at patterns for ideas on how to attach the strap to the purse if you aren't certain. Of course, if you use plastic handles it will be different from using a length from the jeans.

You can still decorate the purse with extras like pins, brooches and whatever else you dream up.

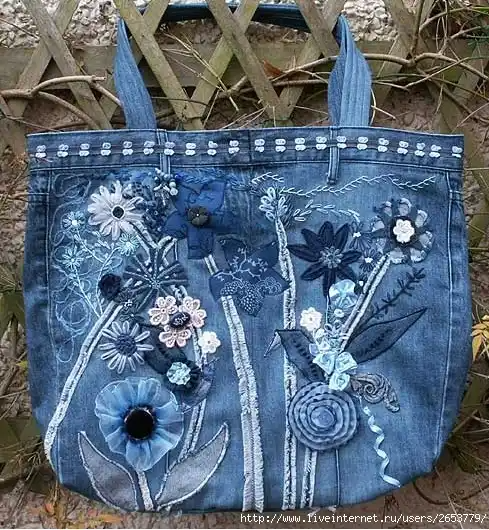
Found at a broken link. Including it because it's such a pretty idea.